Learn How to embed chatbot in website: A Complete Guide
Adding a chatbot to your website is surprisingly simple. It usually just means pasting a small piece of JavaScript code-often called a snippet-into your site’s HTML.
This snippet is what brings the chat widget to life and connects it back to the chatbot platform. For instance, getting Ticketdesk AI running involves adding a quick two-line script right before the closing </body> tag on your pages.
Why an Embedded Chatbot Is a Must-Have for Modern Websites
Look, a chatbot isn’t just a cool gadget anymore. It’s a core part of a smart customer experience strategy. Think of it as your first line of defense-a tireless support agent that’s always on, ready to give customers the instant answers they now expect. It can be the one thing that stops a visitor from getting frustrated and bouncing off your site for good.
Let’s imagine, someone’s on your e-commerce site, credit card in hand, but they have a quick question about shipping times. If they can’t get an answer right away, that cart is likely getting abandoned. An embedded chatbot, trained on your shipping policies, can resolve that question instantly and save the sale.
The same goes for a SaaS company. A chatbot can walk new users through the setup process, answering those common initial questions that create friction and often lead to churn.
Tangible Business Outcomes
The benefits of adding a chatbot aren’t just about convenience; they hit your bottom line directly.
- Drastically Reduce Support Tickets: The bot handles all the repetitive, easy questions, freeing up your human agents to tackle the complex issues where they’re needed most.
- Capture More Qualified Leads: Your chatbot can engage visitors, ask a few qualifying questions, and grab contact info, turning casual browsers into real leads for your sales team.
- Boost Customer Satisfaction: People love getting instant answers, 24/7. When they feel heard and valued, they stick around.
For anyone leading a support team, a tool like Ticketdesk AI is designed to shift your helpdesk from being a cost center to a value-generating machine. It learns directly from your help docs, FAQs, and knowledge base to automate even complex queries with impressive accuracy. We dive deeper into these benefits in our guide on using an AI chatbot for customer support.
The move to automation is happening fast. The global chatbot market hit $9.3 billion this year and is on track to reach a staggering $27.29 billion by 2030. This growth is fueled by massive efficiency gains. Some companies are reporting over $300,000 in annual savings just by letting a bot handle routine support tickets. You can read more about these powerful AI chatbot statistics to see where the market is headed.
Getting Your Chatbot Live With a Simple Code Snippet
Once you’ve nailed down the strategy behind your chatbot, the next step is actually getting it onto your website. Thankfully, the days of needing a full development team to embed chatbot in website functionality are over. Most modern platforms, including Ticketdesk AI, rely on a simple code snippet that makes the whole process surprisingly quick.
This is the most direct way to get up and running, and it works pretty much anywhere you have standard HTML. It all boils down to copying a ready-made block of JavaScript and pasting it into your site’s source code. You don’t need to be a developer to pull this off-if you can copy and paste, you can add a chatbot.
At its core, this little piece of code does two key things: it identifies your specific chatbot with a unique ID and then loads the widget from its source. It loads asynchronously, which is just a fancy way of saying it won’t slow down your website or hurt your user experience.
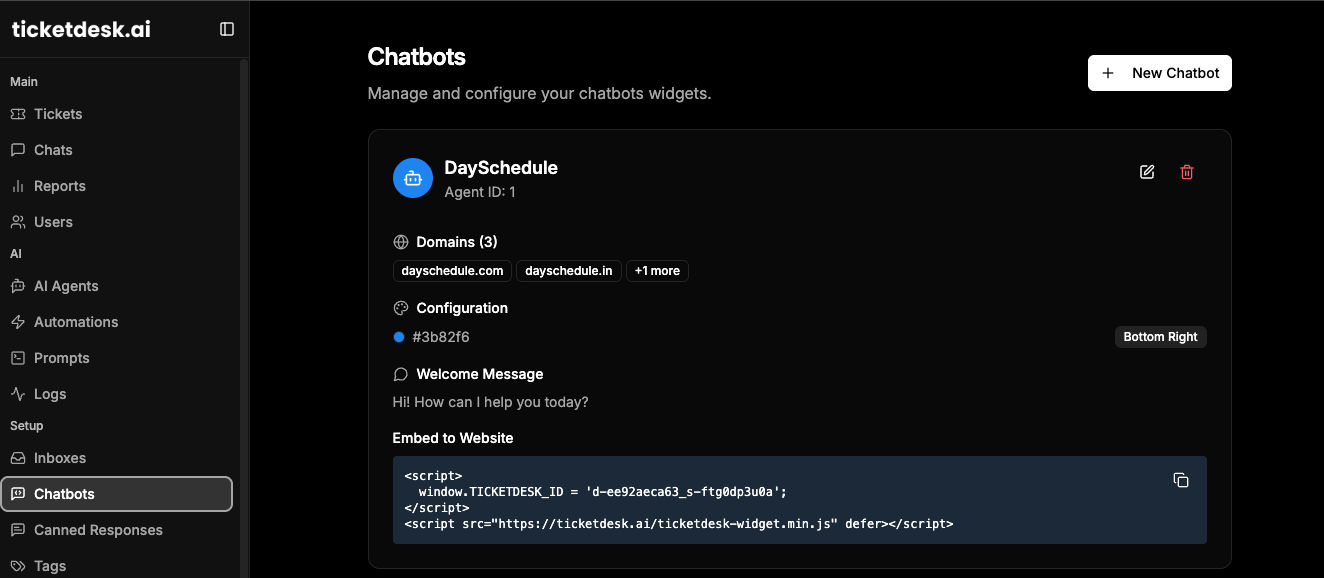
How to Use the Ticketdesk AI Snippet
Ticketdesk AI gives you a clean, simple code block that’s designed to be foolproof. You can find the widget by installing it from NPM or by grabbing the source directly from the official Ticketdesk widget repository on GitHub.
First, you’ll need your unique TICKETDESK_ID. This is what connects the widget on your site to the chatbot you’ve configured in your Ticketdesk AI dashboard. You can find this ID in your account settings after you sign up.
Here’s the exact code you’ll need to embed the chatbot:
<script>
  window.TICKETDESK_ID = 'd-xxxx-xxxx-s-xxxxsxxx'; // Replace with your ID
</script>
<script src="https://ticketdesk.ai/ticketdesk-widget.min.js"></script>
The first line sets your unique ID, and the second pulls in the JavaScript file that makes the chatbot work. Just paste this entire block right before the closing </body> tag in your website’s HTML file. Placing it there is a best practice-it ensures all of your page content loads first before the chatbot script kicks in.
Integrating into Modern JavaScript Frameworks
While the copy-and-paste method is perfect for static HTML sites, things are a little different for modern web apps built with frameworks like React, Vue, or Angular. These Single Page Applications (SPAs) manage content dynamically without full page reloads, which requires a bit more care.
In an SPA, you need to manage the script’s lifecycle to avoid common issues, like the chatbot vanishing when a user navigates to a new page or the script loading multiple times. For React apps, the best way to handle this is by managing the script inside a component using the useEffect hook.
This hook lets you run side effects, like adding a script to the page, but only when the component first mounts. This makes sure the script is added just once and gets cleaned up properly, playing nicely with the framework’s lifecycle.
If you’re a developer looking for more advanced control or want to build custom integrations, the Ticketdesk AI documentation for its API offers much more detailed guidance.
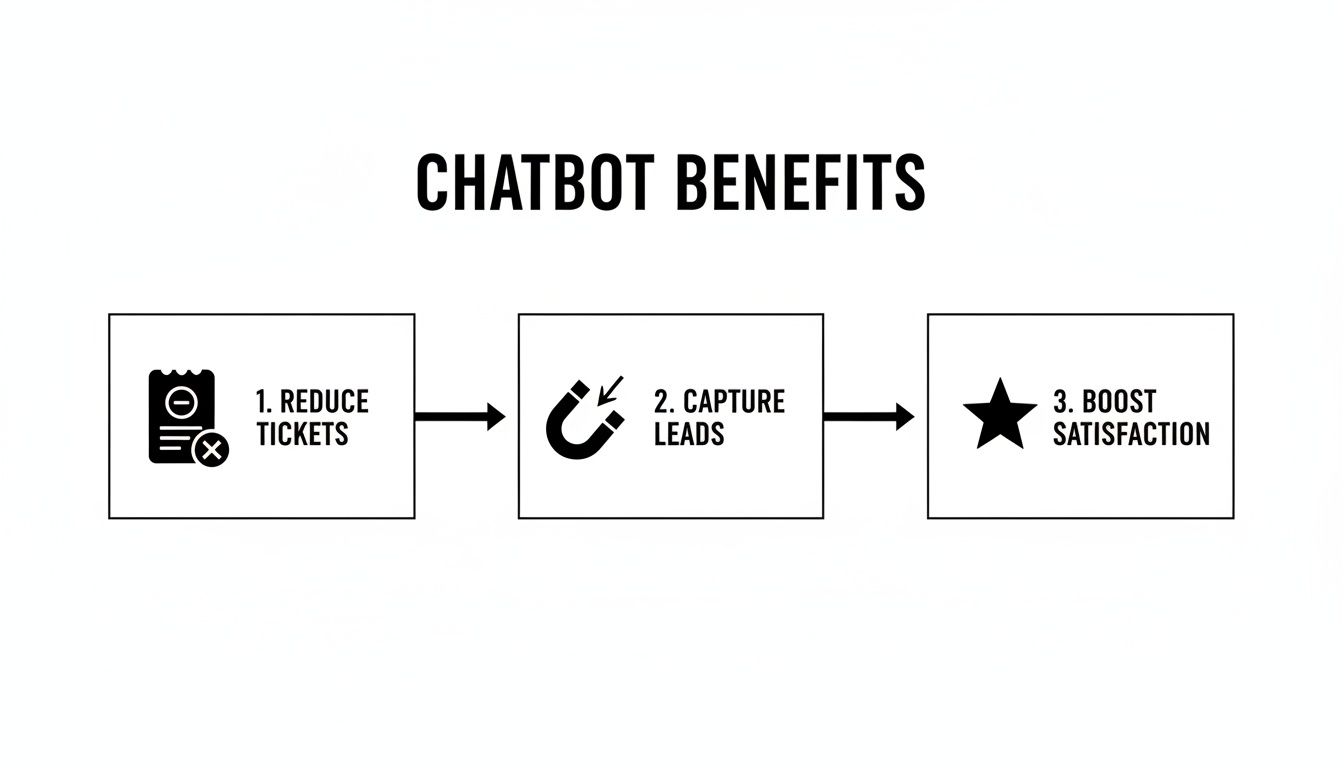
This flow shows exactly how an embedded chatbot translates into real business wins, from deflecting support tickets all the way to making customers happier.
Common Implementation Scenarios
Let’s walk through a couple of real-world examples to see how this plays out.
-
Scenario 1: An E-commerce Store: A small online shop built with custom HTML and CSS wants to add a chatbot to handle shipping questions. The owner opens the
index.htmlfile, scrolls to the bottom, and pastes the Ticketdesk AI snippet just above the</body>tag. The chatbot is live in less than two minutes. -
Scenario 2: A SaaS Application: A software company has a dashboard built with React. One of their developers creates a new
ChatbotWidgetcomponent. Inside auseEffecthook, they add the logic to append the two script tags to the document’sbodywhen the component loads. They then drop this component into their mainApp.jslayout so it’s available on every page.
Key Takeaway: The script snippet is incredibly flexible. Whether you have a simple one-page site or a complex web app, the basic idea is the same. You just need to add the script to your HTML, with a few small tweaks for modern frameworks.
To get a better sense of all the possibilities, it’s worth it to explore different embed options, since each one has its own benefits depending on your specific setup.
Once you move past a basic HTML setup, you’ll likely be working with a powerful CMS or e-commerce platform. For most of us, that means WordPress or Shopify. These two platforms run a huge chunk of the internet, but getting a chatbot embedded in them requires a platform-specific touch.
The end goal is the same: get that little snippet of code onto your site so the chatbot loads on every page. But how you do it matters. Diving into your core theme files is a recipe for disaster if you’re not careful-one typo can bring down your whole site. Luckily, both WordPress and Shopify have much safer ways to get this done.
Adding the Chatbot Snippet to WordPress
If you’re on WordPress, stay away from directly editing your theme’s header.php or footer.php files unless you really know what you’re doing. The big problem is that theme updates can completely wipe out your changes, and your chatbot will vanish.
Instead, here are two much better ways to embed chatbot in website code on WordPress.
First up is the plugin method. A simple, lightweight plugin like “Insert Headers and Footers” is built for exactly this task. You install it, activate it, and then head to its settings page. From there, you just paste the Ticketdesk AI script into the footer section. It’s that easy, and your script will survive any theme update.
Your other option, if you’re trying to keep plugins to a minimum, is to use the built-in “Custom HTML” block. If you’re using a modern block theme, you can go into the Site Editor and drop this block right into your site’s footer. This also keeps the script isolated and safe from theme file changes. For a deeper dive, this chat bot WordPress integration guide has some great strategies.
Pro Tip: After you add the script, always clear your WordPress cache and your browser cache. Aggressive caching plugins can keep serving the old version of your site, making you think the chatbot isn’t working.
Embedding the Chatbot on Your Shopify Store
For Shopify store owners, the process is just as straightforward, though it does involve a quick edit to one of your theme’s Liquid files. It sounds a bit technical, but Shopify’s theme editor makes it safe and easy to reverse if needed.
The file you’re looking for is theme.liquid. Think of this as the master template for your entire store. Adding the chatbot script here ensures it appears everywhere-from the homepage to product pages and even the checkout process.
Here’s how to get it done:
- From your Shopify admin, go to Online Store > Themes.
- Find your live theme, click the three-dot icon, and choose Edit code.
- On the left, look for the “Layout” folder and open the
theme.liquidfile. - Scroll all the way to the bottom until you see the closing
</body>tag.
This is the sweet spot. Just like with a plain HTML site, paste the Ticketdesk AI snippet right before that closing tag. As a quick reminder, here’s the code you’ll be adding:
<script>
  window.TICKETDESK_ID = 'd-xxxx-xxxx-s-xxxxsxxx'; // Replace with your ID
</script>
<script src="https://ticketdesk.ai/ticketdesk-widget.min.js"></script>
Hit the “Save” button in the corner, and that’s it. Your chatbot should now be live across your entire Shopify store, ready to help customers no matter where they are in their shopping journey.
Configuring Your Chatbot for Maximum Impact
Getting the widget live on your site is a great start, but the real magic happens when you configure it properly. An unconfigured chatbot is like a new hire on their first day-full of potential but knowing nothing about your business. The goal is to turn it from a generic tool into a smart, effective member of your support team.
This is where the Ticketdesk AI dashboard becomes your command center. You’re not just enabling a widget; you’re training a specialist to deliver accurate, context-aware answers that genuinely solve customer problems. It all begins by connecting the bot to your company’s brain.
Training Your AI with the Right Data Sources
A chatbot is only as smart as the information it has access to. To make it a resource your customers can trust, you have to feed it the right data. Just think about all the places your own support team (or a customer) would look for an answer-that’s exactly what your AI needs.
The best results come from connecting a mix of your core business knowledge:
- Your Knowledge Base: This is the bedrock. All your articles, tutorials, and how-to guides are perfect for teaching the AI the fundamentals of your product.
- API Documentation: Absolutely essential for any SaaS or software company. This allows the bot to handle technical questions from developers with total precision.
- Internal FAQs: Every support team has that go-to document with common problems and their fixes. Giving this to your AI instantly arms it with answers you already know work.
- User Guides and Manuals: These deep-dive resources give the bot the comprehensive knowledge needed to tackle detailed, multi-step questions.
When you connect these sources in the Ticketdesk AI dashboard, you’re not just uploading files. You’re building a complete understanding of your products and policies inside the AI. This is the most important step for ensuring your bot can actually resolve issues on its own. For a full walkthrough, check out our guide on how to train an AI agent for customer support.
The impact here is huge. With 67% of global consumers having used a chatbot in the last year, people expect them to be helpful. By 2025, it’s predicted that 95% of all customer interactions will involve AI in some way, whether it’s automating replies, assigning tags, or escalating tickets. A well-trained bot can handle up to 80% of routine questions, slashing resolution times. You can see more on these chatbot adoption statistics and what they mean for businesses.
Automating Workflows with Intelligent Routing
Once your chatbot is knowledgeable, the next step is making it efficient. The last thing you want is for every complex question to land in one giant, overflowing inbox. Intelligent ticket routing is how you fix that, making sure every issue gets to the right person or team automatically.
Inside Ticketdesk AI, you can set up simple but powerful automation rules based on what a user is asking about. This is workflow automation that actually works.
Think about these real-world scenarios:
- A customer asks, “My latest invoice is incorrect.” The bot can spot keywords like “invoice” or “billing” and instantly route the ticket to the finance department.
- A user reports, “I’m seeing a 500 error when I try to log in.” Terms like “error,” “bug,” or “can’t log in” can trigger a rule that sends the ticket straight to the engineering team.
- Someone suggests, “It would be great if your app had a dark mode.” Phrases that sound like a feature request can be routed directly to the product team’s backlog.
This kind of automation does more than just save time. It ensures that the experts are seeing the right problems, which leads to faster and more accurate solutions for your customers.
Establishing Clear Escalation Paths
Finally, no AI is perfect. Some problems will always need a human touch. A critical part of your setup is defining a clear, seamless escalation path for when the bot gets stuck. The goal is to make the handoff to a human agent so smooth that the customer barely notices.
You should set up rules for when the bot proactively offers to connect the user with a person. This could be triggered if a user expresses frustration, asks the same question three times in a row, or just types “talk to a human.”
Finding that sweet spot between powerful automation and easily accessible human support is the real key to creating a customer service experience that people love.
Designing a Seamless Chatbot User Experience
Let’s be honest: a poorly designed chatbot does more harm than good. It’s frustrating for customers and can drive them away before they even get a chance to see what you offer. To truly make a chatbot a valuable part of your website, the user experience (UX) has to be front and center. It’s not just about what the bot can do; it’s about making the entire interaction feel natural, helpful and completely in sync with your brand.
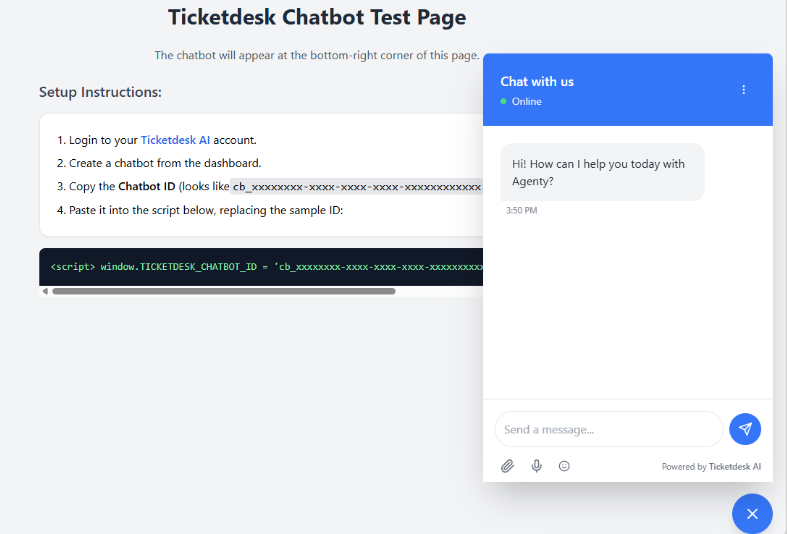
Think of the chatbot widget as a digital handshake. It’s often the first thing a user interacts with on your site, so its appearance and first impression are critical.
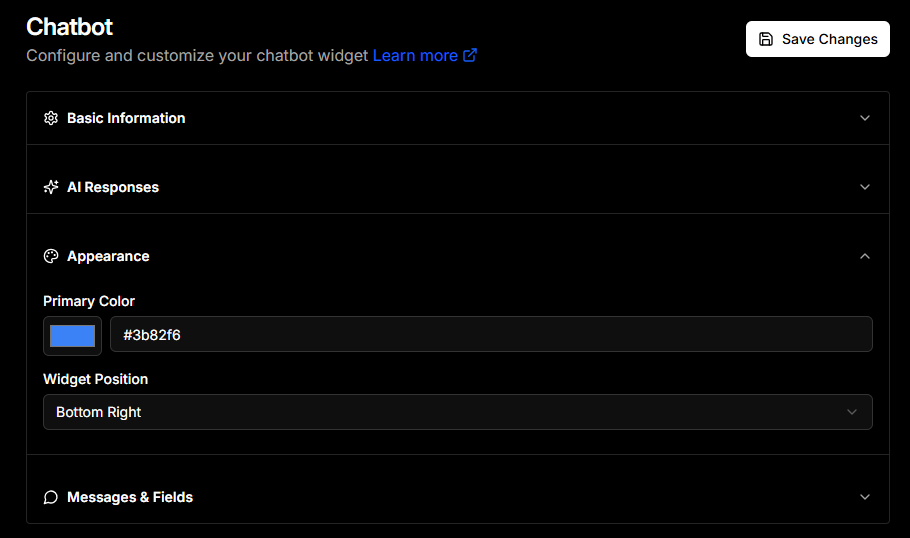
Aligning the Chatbot with Your Brand Identity
Nothing screams “tacked-on afterthought” like a chatbot that clashes with your website’s design. When the colors, fonts, and tone are off, it feels like a disconnected third-party tool, and that can make users hesitant to trust it.
Take the time to dial in the visual elements for a cohesive feel:
- Colors and Logo: Use your brand’s primary and secondary colors for the widget and chat window. Upload your company logo as the chatbot’s avatar so it’s instantly recognizable.
- Widget Placement: The bottom-right corner is pretty much the standard for a reason. It’s visible without being intrusive. Just make sure it’s not covering up important navigation or call-to-action buttons.
- Font and Tone: The font inside the chat window should match your site’s typography. Even more important is the bot’s tone of voice. Is your brand professional? Friendly? A little quirky? Make sure the bot talks the talk.
This level of detail makes the chatbot feel like a genuine part of your team, not just a plugin you installed. A well-branded bot is far more approachable and encourages people to actually use it.
Crafting a Compelling Welcome Message
The very first message your chatbot sends is its most important. It sets the tone for the conversation and, more importantly, manages the user’s expectations right away. A vague “How can I help you?” is a recipe for disappointment when the user asks something beyond the bot’s abilities.
A great welcome message does three things:
- Greets the User: A simple, friendly opening makes the bot feel less robotic.
- Explains Its Purpose: Be direct about what it can do. Something like, “I can help you track an order, answer product questions, or connect you with support.”
- Offers Starting Points: Give users buttons or quick replies like “Track My Order” or “View Pricing.” This guides them and shows them what’s possible from the get-go.
That kind of upfront clarity prevents the dreaded “I don’t understand” loop and gets users to a solution faster.
The growth in this space is undeniable. The market for embedded chatbots is projected to hit $15.57 billion in 2025 and is on track to reach $46.64 billion by 2029. With 51% of consumers preferring bots for quick interactions, the pressure is on to deliver an experience that works. By 2025, an estimated 95% of all customer interactions will be powered by AI. You can explore more of these compelling chatbot statistics to understand the shifting landscape.
Ensuring a Clear Path to Human Support
Even the smartest AI hits a wall sometimes. One of the biggest sources of user frustration is feeling trapped in a conversation with a bot that can’t help. The escape hatch to a human agent needs to be obvious and easy to find.
Making a user guess the magic phrase (“talk to an agent,” “speak to a human”) is just bad UX. Instead, build clear off-ramps into the conversation. If the bot fails to understand a question twice in a row, it should proactively offer to connect the user to a person.
Better yet, include a persistent “Talk to a Human” button right in the chat interface. This gives users a sense of control and peace of mind. Knowing that real help is just a click away makes people more willing to try the bot in the first place. It’s this balance that creates a supportive experience, not a restrictive one.
Of course, even with a simple process, a few questions always pop up when you’re ready to embed a chatbot on your website. Let’s walk through some of the most common ones we hear so you can move forward with confidence.
Frequently Asked Questions About Embedding Chatbots
Will Adding a Chatbot Slow Down My Website?
This is probably the number one concern we see, and it’s a totally fair question. The good news is that modern chatbots, especially tools like Ticketdesk AI, are built with performance in mind.
The chatbot script is designed to load asynchronously. In simple terms, this means it loads in the background without getting in the way of your main page content. Your site still feels snappy to visitors, and critical performance metrics like Core Web Vitals aren’t dragged down. Just make sure whatever provider you choose prioritizes speed and uses a Content Delivery Network (CDN) to serve their script.
How Technical Do I Really Need to Be?
Honestly, it depends on how you want to do it. For a basic HTML site or if you’re using a simple WordPress plugin, it’s literally as easy as copying and pasting a single snippet of code. If you can copy-paste, you can do it in a few minutes flat-no developer needed.
Now, if you’re working with something more complex like a React or Vue.js app, a little familiarity with that framework will definitely help. That said, platforms like Ticketdesk AI are designed to make the initial setup as painless as possible for just about anyone.
What the “Code” Actually Looks Like
For most people, this is all you’ll ever have to deal with. It’s clean, simple, and not nearly as scary as it sounds.<script> window.TICKETDESK_ID = 'd-xxxx-xxxx-s-xxxxsxxx'; // Replace with your ID </script> <script src="https://ticketdesk.ai/ticketdesk-widget.min.js"></script>
How Do I Know If My Chatbot Is Actually Working?
You can’t improve what you don’t measure. Figuring out your chatbot’s ROI comes down to tracking a few key metrics.
Here’s what I recommend keeping an eye on:
- Resolution Rate: This is the big one. How many customer issues does the bot solve on its own, with zero human help? A high number here is a great sign.
- Escalation Rate: On the flip side, how often does a conversation get handed off to a human agent? You want to see this number stay low.
- Customer Satisfaction (CSAT): Nothing beats direct feedback. A simple post-chat survey asking users to rate their experience tells you exactly how helpful they found the bot.
- Average Response Time: While bots are pretty much instant, this metric is great for benchmarking their performance against your human team.
Ticketdesk AI has a built-in analytics dashboard that makes tracking these KPIs straightforward, giving you a clear picture of the impact it’s having.
Can I Make the Chatbot Match My Brand?
Absolutely, and you definitely should. A chatbot that feels like an integrated part of your website builds trust. The last thing you want is a generic, third-party widget that looks tacked on.
Any good platform, including Ticketdesk AI, will give you plenty of customization options.
You should be able to easily change the widget’s colors, pop in your company logo, and write your own welcome messages. This small step ensures the bot’s look and feel aligns perfectly with your brand, creating a seamless experience for your users right from the start.

Ready to get started?
Join hundreds of teams using Ticketdesk AI to deliver exceptional customer support.